> For the complete documentation index, see [llms.txt](https://docs.catfee.io/llms.txt). Markdown versions of documentation pages are available by appending `.md` to page URLs; this page is available as [Markdown](https://docs.catfee.io/en/seamless-energy/wallet-integration/tronlink-setup.md).

# TronLink App Setup

Configure a CatFee Seamless Energy plaintext gRPC node in the TronLink mobile app and verify your first transaction.

The TronLink mobile app supports custom TRON nodes. After selecting a CatFee Seamless Energy node, the wallet continues signing locally, while the node prepares ENERGY or BANDWIDTH as required before broadcasting the original transaction.

{% hint style="warning" %}
The TronLink mobile app supports plaintext gRPC nodes only. Use `{NodeSlug}.catfee.pro` with port `50051`, and do not enable SSL/TLS.
{% endhint %}

## Before you begin

Open **Seamless Energy** in the CatFee User Center and confirm that:

* The node is enabled
* You have obtained the node identifier, `{NodeSlug}`
* Bound address authentication is selected
* The current TronLink wallet address is bound to the node

Bound address authentication is recommended for ordinary wallet users because the TronLink mobile app does not need to pass an additional `CF-NODE-KEY`.

## Setup steps

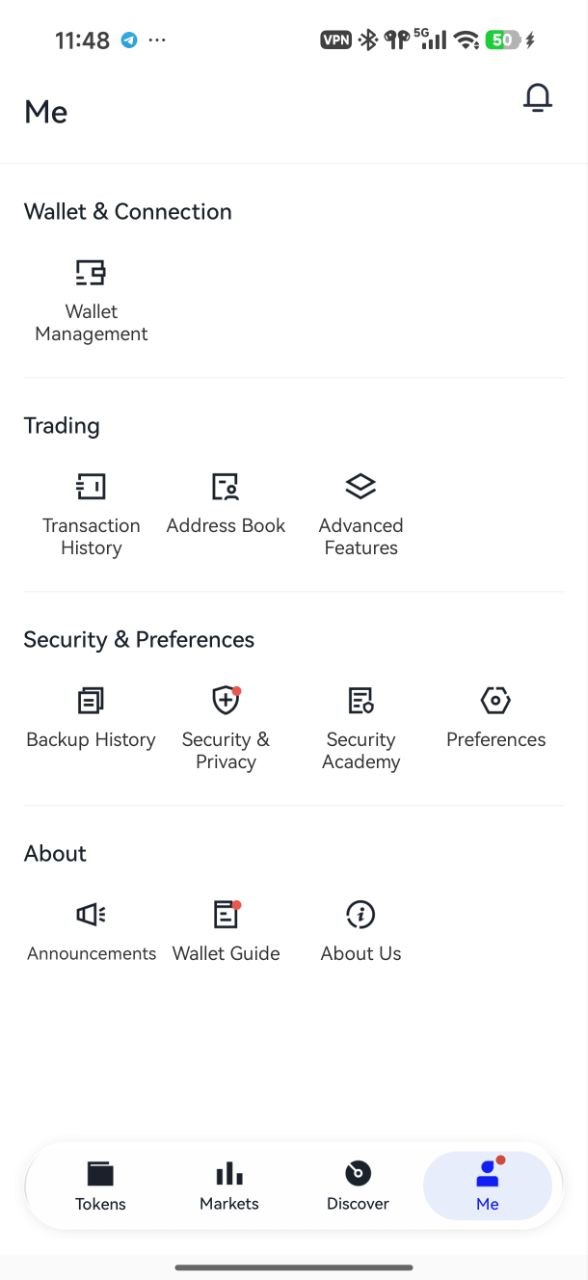
### 1. Open “Me”

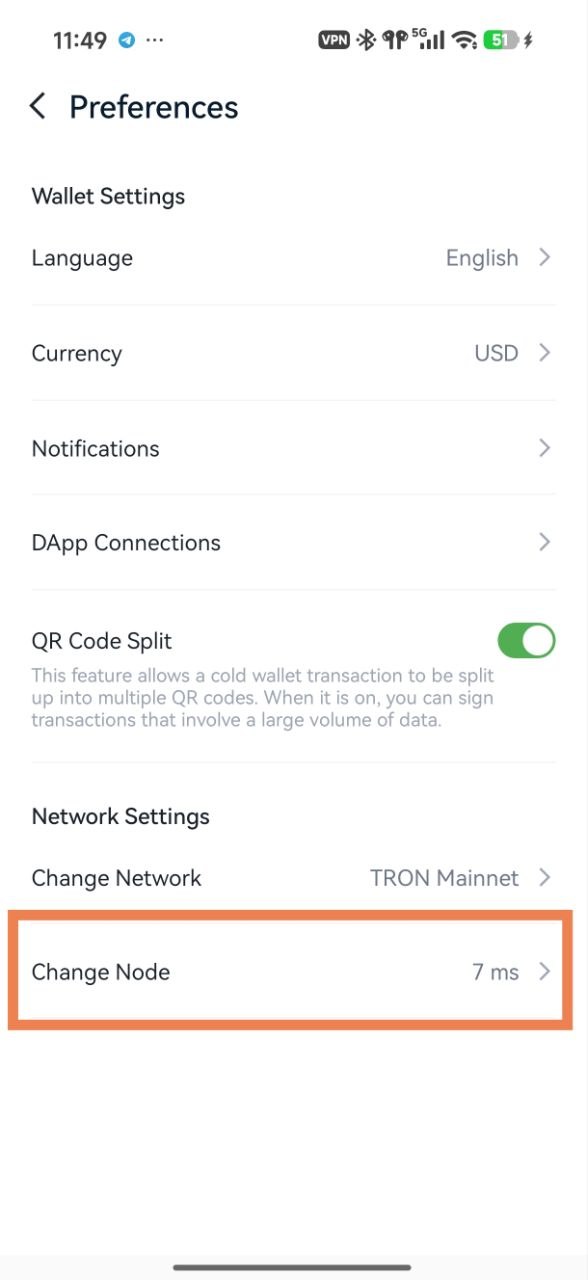
Open the TronLink app, tap **Me** at the bottom, then tap **Preferences**.

<figure><img src="https://4164384423-files.gitbook.io/~/files/v0/b/gitbook-x-prod.appspot.com/o/spaces%2Fa332YYkbT2p9snj9atS0%2Fuploads%2Fgit-blob-4ad68dfd82cd16fe0dc15ad0c09491c028e508b4%2Ftronlink-app-my-page.jpg?alt=media" alt="Me page in the TronLink app"><figcaption><p>Open “Me” and tap “Preferences”</p></figcaption></figure>

### 2. Open “Change Node”

Under “Network Settings” on the Preferences page, tap **Change Node**.

<figure><img src="https://4164384423-files.gitbook.io/~/files/v0/b/gitbook-x-prod.appspot.com/o/spaces%2Fa332YYkbT2p9snj9atS0%2Fuploads%2Fgit-blob-736123ca986a6f1f8f0ce0b54ef17e09ad678355%2Ftronlink-app-switch-node-entry.jpg?alt=media" alt="Change Node entry in TronLink app preferences"><figcaption><p>Tap “Change Node” under “Network Settings”</p></figcaption></figure>

{% hint style="info" %}
Make sure you are configuring a TRON network node. Do not select an EVM network configuration such as Ethereum, BSC, or BTTC.
{% endhint %}

### 3. Add a custom node

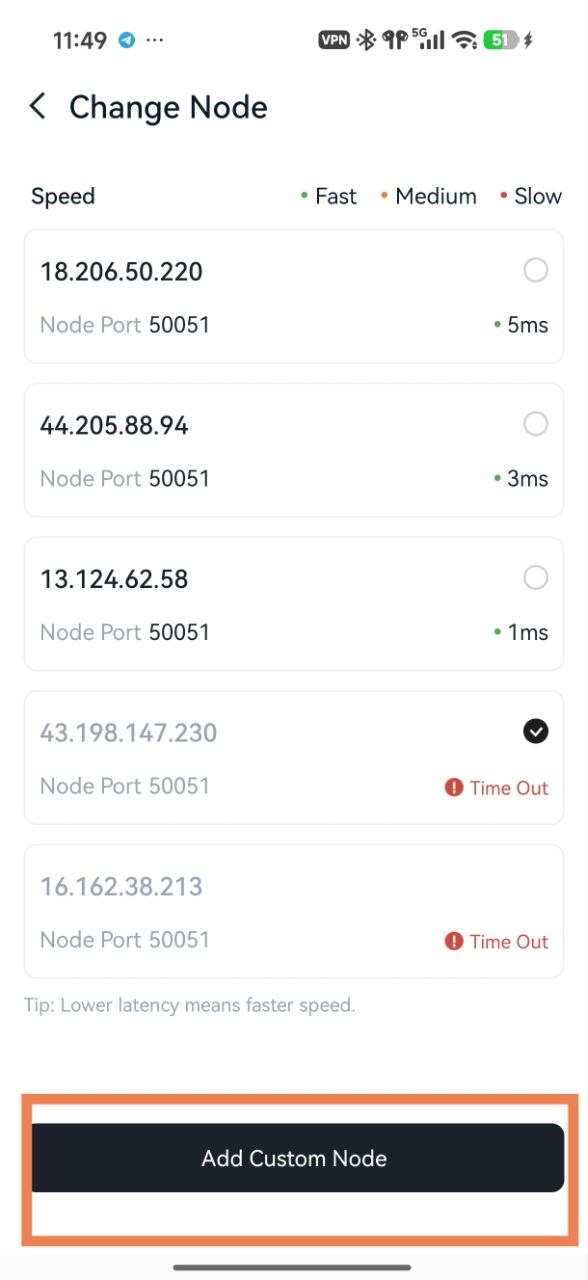
On the “Change Node” page, tap **Add Custom Node** at the bottom.

<figure><img src="https://4164384423-files.gitbook.io/~/files/v0/b/gitbook-x-prod.appspot.com/o/spaces%2Fa332YYkbT2p9snj9atS0%2Fuploads%2Fgit-blob-fafeb1d7fa008cf5047188a2e9c5f4069991f77a%2Ftronlink-app-node-list-before-add.jpg?alt=media" alt="TronLink app Change Node page before adding a custom node"><figcaption><p>When no CatFee node is listed, tap “Add Custom Node” at the bottom</p></figcaption></figure>

### 4. Enter the node information

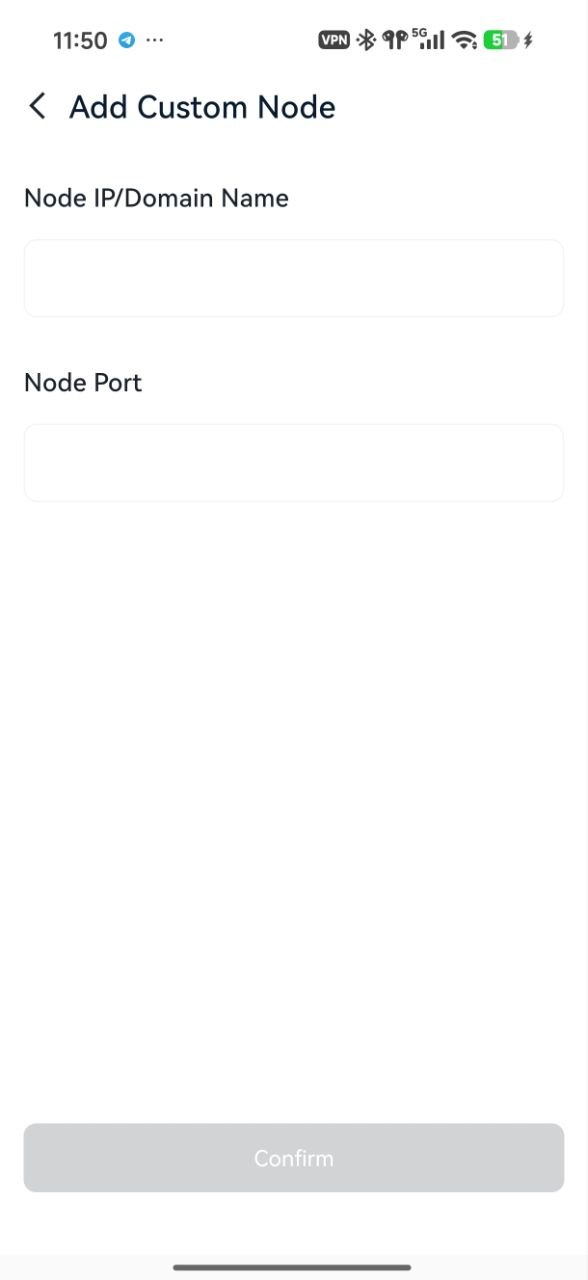
On the “Add Custom Node” page, enter:

```
Node IP/Domain Name: {NodeSlug}.catfee.pro
Node Port: 50051
```

Do not add `http://` or `https://` to the domain. Enter `50051` separately as the port.

<figure><img src="https://4164384423-files.gitbook.io/~/files/v0/b/gitbook-x-prod.appspot.com/o/spaces%2Fa332YYkbT2p9snj9atS0%2Fuploads%2Fgit-blob-add1f09761026355588f5181275c2bbe4beb2ef8%2Ftronlink-app-add-custom-node.jpg?alt=media" alt="Add a Custom Node page in the TronLink app"><figcaption><p>Enter the node domain and port, then tap “Confirm”</p></figcaption></figure>

### 5. Select the custom node

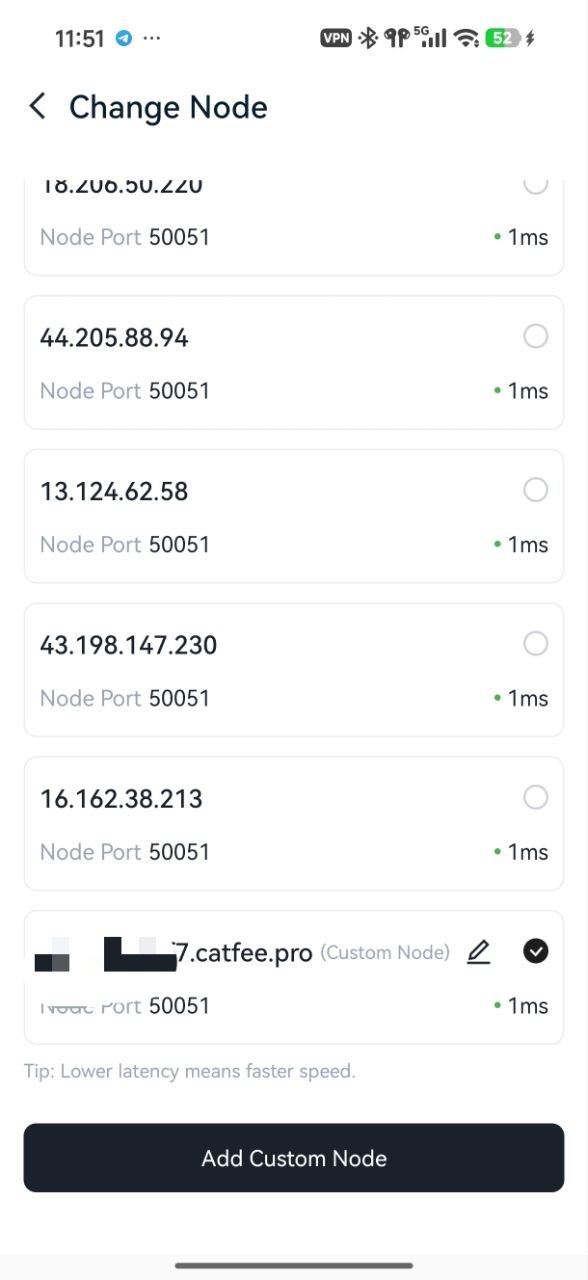
After tapping **Confirm**, return to the “Change Node” page. Find the `.catfee.pro` entry marked “Custom Node” and tap the selection control on the right to switch to it.

A selection indicator appears next to the active node. Confirm the current node by checking its domain and port `50051` in the list.

<figure><img src="https://4164384423-files.gitbook.io/~/files/v0/b/gitbook-x-prod.appspot.com/o/spaces%2Fa332YYkbT2p9snj9atS0%2Fuploads%2Fgit-blob-794df39ac7442ed1287608315362f1f9327d5eaa%2Ftronlink-app-node-list.jpg?alt=media" alt="TronLink app node list after adding a CatFee node"><figcaption><p>Select the newly added CatFee custom node</p></figcaption></figure>

Switching nodes does not change your wallet address or assets. Transactions are still signed locally by the TronLink app.

### 6. Send a small test transaction

Start with a small transaction:

* A small TRC20 transfer to verify ENERGY preparation
* A small TRX transfer to verify BANDWIDTH preparation

After confirming that the transaction can be signed, broadcast, and recorded on-chain successfully, you can use the node for everyday transactions.

## Confirm the setup

* The TronLink app is currently using the CatFee Seamless Energy node
* The wallet signing flow remains unchanged
* Transactions broadcast normally and return results
* The corresponding resource processing or usage record appears in the CatFee User Center

## Common questions

* **Should the node address include `https://`?**\
  No. The TronLink mobile app uses plaintext gRPC. Enter `{NodeSlug}.catfee.pro` and port `50051`.
* **Should I enable SSL/TLS?**\
  No. SSL/TLS must remain disabled because the dedicated TronLink app node uses plaintext gRPC.
* **Do I need to enter an API KEY?**\
  Not when using bound address authentication. Make sure the current wallet address is bound in the CatFee User Center.
* **Will switching nodes expose my private key?**\
  No. The private key remains in the TronLink app, and only signed transactions are sent to the node.
* **What should I check if the test transaction fails?**\
  Confirm that the node is enabled, the domain and port are correct, SSL/TLS is disabled, the wallet address is bound, and the CatFee balance is sufficient.

Return to [Wallet Integration](/en/seamless-energy/wallet-integration.md), or read [Security](/en/seamless-energy/security.md) to learn about private-key and transaction security boundaries.